PUZZLE PIECE ACTIVITY
Software: Photopea / Adobe Photoshop
Activities Covered: ACTIVITY 14 – ACTIVITY 34
OBJECTIVE
Students will assemble puzzle pieces into the silhouette guide using proper selection, erasing, alignment, and layer management skills.
Puzzle Assembly Direction
After reviewing the submitted sample, the issue is not missing pieces.
The problem appears to be that the pieces were resized or forced to match the silhouette guide.
Please note:
The silhouette is only a visual placement reference.
It is not intended to be used for resizing, stretching, or adjusting puzzle pieces.
Puzzle pieces must be aligned using their actual edges and curves — by matching piece-to-piece connections — not by forcing them to fit the outer silhouette shape.
If gaps are appearing, it is usually due to one or more of the following:
• Pieces were resized
• Pieces were slightly misaligned
• Edges were not selected correctly
• The silhouette was followed instead of the true puzzle contours
Do NOT resize the puzzle pieces to eliminate gaps.
Correct Method:
1. Zoom in closely
2. Align the curves carefully
3. Match the interlocking shapes precisely
4. Adjust positioning with small, accurate movements
When aligned properly using the real puzzle edges, the gaps will naturally disappear.
The silhouette serves only as a visual guide and should never override the actual structure of the puzzle.
IMPORTANT NOTE BEFORE PASSING (REQUIRED)
- Puzzle Piece 1
- Puzzle Piece 2
- Puzzle Piece 3 … until last piece
TOPMOST layer = Puzzle Piece 1 Next going DOWN = Puzzle Piece 2 TOP → BOTTOM ORDER ONLY
2. [OPTIONAL] BLENDING OPTION
Apply EXACTLY this setting:
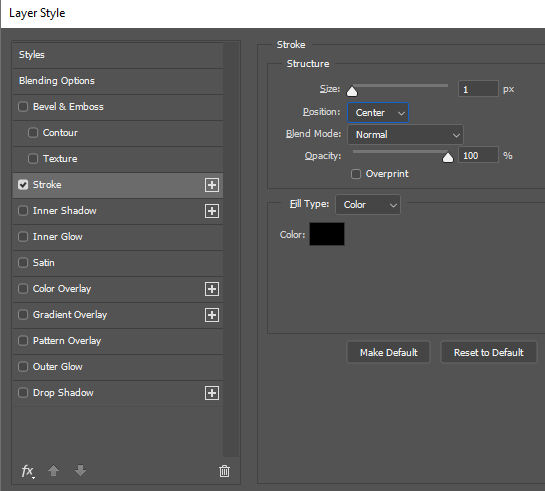
- Stroke: ON
- Size: 1 px
- Position: Center/Outside/Inner
- Normal 100%/Depends on the visuals
- Black Color
DETAILED NUMBERING EXAMPLE
| Layer Position | Correct Name |
|---|---|
| Very Top Layer | Puzzle Piece 1 |
| 2nd | Puzzle Piece 2 |
| 3rd | Puzzle Piece 3 |
| 4th | Puzzle Piece 4 |
| 5th | Puzzle Piece 5 |
| 6th | Puzzle Piece 6 |
| 7th | Puzzle Piece 7 |
| 8th | Puzzle Piece 8 |
| 9th | Puzzle Piece 9 |
| 10th | Puzzle Piece 10 |
| 11th | Puzzle Piece 11 |
| Very Bottom | Puzzle Piece 12 |
After you finish assembling the puzzle, do not rearrange the layers for numbering.
The layer that is currently at the very top of your Layers panel becomes:
Puzzle Piece 1
The layer directly below it becomes:
Puzzle Piece 2
Continue renaming each layer in order, moving downward, until you reach the very bottom layer.
You are numbering strictly based on the Layers panel order —
not by puzzle position, not left to right, and not top to bottom visually.
Do not overthink it.
Simply follow the layer stack from TOP → BOTTOM.
This process was already demonstrated live during our online session.
CHECKLIST BEFORE SUBMITTING
- All layers renamed as Puzzle Piece #
- Numbering follows TOP → BOTTOM
- Stroke applied to ALL pieces
- No leftover background
- Aligned to silhouette
- Student info completed
RUBRICS FOR ACTIVITY 14–34 (DETAILED)
| Criteria | Detailed Description | Points |
|---|---|---|
| Selection Tool Mastery |
- Used appropriate selection tool for each shape - Edges follow actual puzzle shape - No over-selection or missing parts Deductions: • –2 per badly selected piece • –2 for improper tool usage |
25 |
| Background Erasing Quality |
- Edges are clean and smooth - No remaining background pixels - No white halos around pieces Deductions: • –2 per piece with dirty edges • –2 if halos are visible |
25 |
| Alignment Accuracy |
- Pieces match silhouette guide - No overlaps between pieces - No visible gaps Deductions: • –2 per misaligned piece • –2 per visible gap |
20 |
| Layer Organization (CRITICAL) |
- ALL layers renamed as Puzzle Piece # - Numbering follows TOP → BOTTOM order - No skipped numbers - [Optional] Stroke applied to ALL pieces Penalties: • –2 per wrong layer name • –2 if order is incorrect • NO STROKE = NOT GRADED |
10 |
| Student Information |
- Name complete and correct - Section and group filled - Followed file name format Deductions: • –2 incomplete info • –2 wrong file name |
10 |
| TOTAL | 100 | |
UPLOAD METHODS AND REQUIREMENTS
Activity (Number) [Selection and Basic Editing Tools ] - Group Number - LastName - FirstName - Section
WRONG FILE NAME = NOT GRADED
Activity (Number) [Selection and Basic Editing Tools] - Group Number - LastName - FirstName - Section
EXAMPLES OF CORRECT FILE NAMES
- Activity 14 [Selection and Basic Editing Tools] - Group 3 - DelaCruz - Juan - BSIT1A.psd
- Activity 20 [Selection and Basic Editing Tools] - Group 1 - Santos - Maria - BSIT1B.psd
- Missing brackets [ ]
- Wrong spacing or order
- Using commas instead of dashes
- No activity number
- Nicknames instead of real last name
- Renaming inside Google Drive only
WHAT TO ATTACH & HOW YOU WILL BE GRADED
- Both leaders and members must submit a PSD file of their group work.
- ONLY PSD files will be graded.
- Other file formats will NOT be accepted.
- Submissions must be:
- Accessible and viewable
- Not corrupted
- A PSD file only (no screenshots or other formats)
You may submit your PSD using ANY ONE of the following methods:
- Direct PSD file attachment
- Google Drive link (set to “Anyone with the link can view/download”)
- Photopea sharing link
UPLOADING GUIDE
FOR LEADERS
Leaders will share the finished activity with members using ONE of the following:
- A Google Drive link set to Anyone with the link can view/download, or
- A Photopea link via:
File → Share → PSD → Copy Generated Link
This allows the instructor and classmates to view, download, and review the file.
FOR MEMBERS
- Open the file shared by the leader using Photopea.
- Rename the file using Save As PSD to create your own copy.
- Use this file name format:
ACTIVITY 13 [Layer Hierarchy Practice & Visibility Tools] - Group Number - LastName - FirstName - Section - Upload the renamed file back to Photopea.
- Go to:
File → Share → PSD → Copy Generated Link - Submit this link to the designated Google Classroom post as a link attachment.
ALTERNATIVE UPLOAD OPTION
- Leaders and members may attach the PSD file directly to Google Classroom.
- Use the Photopea sharing link, or
- Use a Google Drive link set to Anyone with the link.
REVIEW AND LEARNING RESOURCES
Use these lessons to review the tools required for this activity. All techniques used in the puzzle activity came from these modules.
-
Introduction to Photopea Basics
https://flowchartc.my.canva.site/w2-introduction-to-photopea-basics -
Introduction to Layers, Move Tool, and Navigation Tools
https://flowchartc.my.canva.site/w3-introduction-to-photopea-basics -
Introduction to Layer Visibility, Transform Tool and Opacity
https://flowchartc.my.canva.site/l4-6-introduction-to-layer-visibility-transform-tool-and-opacity -
Selection and Basic Editing Tools
https://flowchartc.my.canva.site/l7-introduction-to-layer-visibility-transform-tool-and-opacity